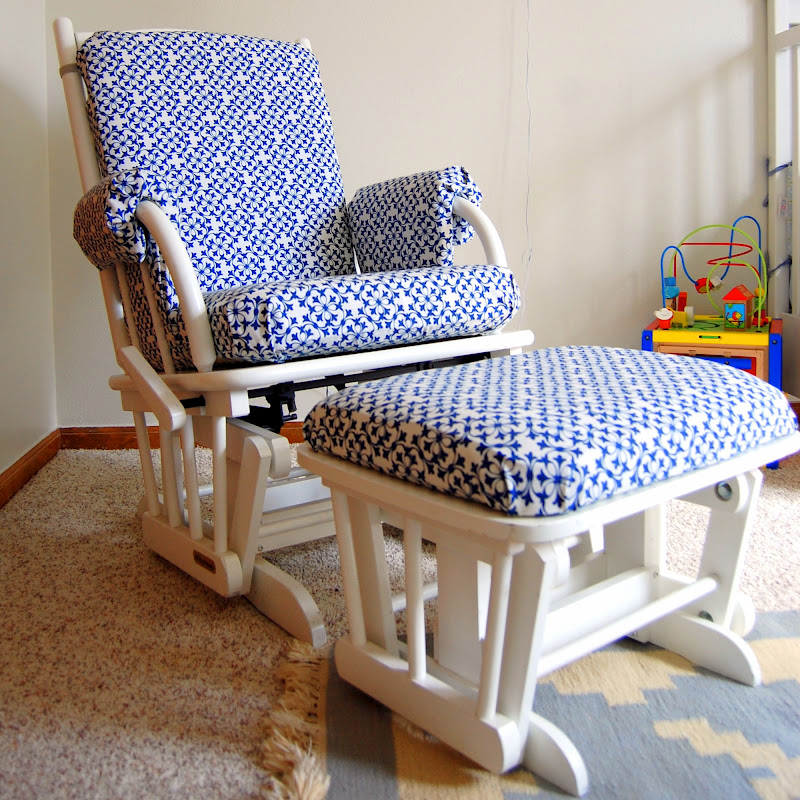
This glider is super comfortable, but after going through two babies it was stained and just plain ugly. After about $20 in fabric this chair is now one of my favorite things to look at. No longer an eye sore, I am happy to keep it around a little bit longer. This is the AFTER picture.
And here is the before - the ottoman was so dirty since that was where our shoes landed and the bottles rested before they inevitably tipped over and stained the fabric. I am so embarrassed to even reveal how dirty it was!

But now it is lovely - yay. This was not an easy endeavor, but completely worth the 3 hours it took me.


Tutorial below

First is the easy part - staple the fabric onto the ottoman piece. Yes if I was a professional I would have used a sewing machine and added piping. In an optimistic effort I did purchase the piping. But I quickly remembered that I am a novice and that was a ridiculous hope that I would also use piping. The trick with stapling on the fabric is to keep turning the pillow seat over ans you pull the fabric tight and get ready to put a staple in to make sure the fabric is lining up correctly and evenly stretched.

The I trim the excess fabric and reattach to the base.


The arm rests were by far the most time consuming part of this.


I ironed my new fabric right onto the old fabric. I have no intention on ever seeing the old fabric again so in this case that was fine with me. And I like to take the shortest road, so making any type of slip cover was out. I folded the fabric around the arm rest and ironed it on with hem tape and cut holes around the snaps. It was not easy to iron under the curved part but it was possible. I had to pleat the fabric and iron each pleat to the next and maybe I was a little ghetto and threw in a couple staples for extra strength hold. I'm not telling.

The next step was to iron on a panel. This part of the seat is not seen, so I was not trying to be perfect. I folded under the sides of the panel fabric and ironed it onto the cushion.

For the seat and back cushion I ironed on the top fabric and then ironed on a bottom panel - I was starting to lose interest and forgot to take pictures. But you get the idea.

I have this same exact rocking chair and am ready to cover up those same stains! I too don't sew and am happy to see there is a way to cover it without the ol' sewing machine. When you say you ironed on the fabric, what do you use to get it to stick to the cushion?
ReplyDeleteShe used hem tape. It will work, but will lose its strength and durability after a while.
ReplyDeleteVERY TRUE! I wish I was a seamstress but I have to cheat. :) I would agree that heat and bond hem tape is more of a 1-3 yr deal depending on how much time you spend on the seat. In our case we really only used it a lot when the baby was an infant - so it still looks great!
DeleteI love it! How many yards did you need? Thanks!!
ReplyDeleteI do not remember. I actually used brown paper and cut out the sizes of the pillows and brought it to the fabric store and they helped me figure out how much I needed. I am not good at measuring or guesstimating so I try to leave that to the professionals. Thanks for your feedback!
DeleteActually I'm also looking for a new chairs that I put on my living room and that chairs are looks beautiful and I like the design.
ReplyDeleteTrying out your method on my chair today. I am SO not a sewing girl so I was thrilled to see your post. Already finished the ottoman, now onto those dang armrests! Thanks for inspiring me!
ReplyDeleteI've been looking EVERYWHERE for cushions for my discontinued chair. I was so excited when I saw this post! All the other sites had way too much sewing for an amateur like myself. Love it!
ReplyDeleteI love this idea! My glider is not stained or old looking but I want to change the color for baby #2's room. Do you think the iron on tape would allow me to go back to the original fabric if I ever wanted to?
ReplyDeleteHow did you get the cushion off the ottoman? Mine is attached with weird hardware. Great tut btw!! :)
ReplyDeleteMy cushion came off by unscrewing it from the base. Maybe if yours is weird you could try bringing it into an ace hardware store or a place like that and they could help you figure out how to remove it? Good luck!!
Deletethis post makes me so happy! i am expecting my first baby and am trying to be as thrifty and crafty as possible, however i am also not a sewer! thank you so much for this! :)
ReplyDeleteI love this idea! What type of fabric did you use? Cotton based?
ReplyDeleteHi - I used an "outdoor" fabric for this which is a little heavier and more durable.
DeleteI'm so excited to try this out! I too am not a sewer so this is the prefect alternative!!!
ReplyDeleteQuick question so you did iron on material to the bottom of seat cushion and back of back rest cushion?
ReplyDeleteSo Happy when I saw your tutorial!! It there a specific type of stapler??
ReplyDeleteJust covered a nursery glider for my daughter in law - came out great! Primed the wood white and spray painting it tomorrow. She is going to be thrilled!
ReplyDeleteAnother first time mom here, looking to recover and repaint a hand me down glider. I am so happy I found this tutorial!! Totally looks doable!! My back cushion has the little circles pressed into- I don't even know the proper term for this. Do you have any ideas on how to use the same idea to cover that type of cushion on the back? It's also curved across the top of the back instead of a straight line. Maybe I could just take out those little circles? I imagine their just for decor. As for the curved back- I imagine I'll just have to fold, pleat, and re-iron as you did for the armrests. Did you cut holes for the original ties to tie the back on the chair? THANK YOU!!! Excited to try this!!
ReplyDeleteSo my glider has the same back cushion as yours. Did you ever figure out how to do it?
DeleteI'm also looking for a new chairs that I put on my living room
ReplyDeleteHow did you attach the fabric to the underside of the cushion? I dont see any staples. Did you hand sew this to the old fabric?
ReplyDeleteThank you for posting your tutorial :)
Delete